This is part five in my series on Key Vault. It's time to access some keys on sites hosted on Azure Web Apps
Setting up the Web App
In the previous blog post I talked about certificate based vs. ClientId/ApplicationId based access to the Key Vault. Now it's time to use one of the two.
ClientId/ApplicationId
It is important to know that we can always use the ClientId/ApplicationId approach, but that we should always be aware of not storing the values for those settings directly in the config files. That is also the reason why I usually prefer the certificate-based approach.
In your application, we will use the same code we've used for now. It's actually exactly the same code as in part 3, of this series. The trick is that when using an Azure Web App, we now have the opportunity to use Azures feature of app settings overrides. This means that in your code, you will access and find the ClientId/ApplicationId via the appSettings in your web.config file. These can point at a development Key Vault, that only contains keys for a development setup. Then once you publish your application to Azure Web apps, we can override the setting via the Azure Portal.

----------
As mentioned, the code is simple - we just use ConfigurationManager.AppSetting["ClientId"] - This will make sure that when running on an Azure Web app the value will be taken from the settings we set in the Azure portal. If a setting isn't present there, it will fall back to the one in your web.config.
Also notice that appSettings can be a "Slot setting" - this allows the setting to be different depending on which deployment slot of your application it is running int. This is great for having different environments like a staging or pre-production environments, that might not share the same keys as production, and therefore should have their own Key Vaults.
Access via Certificate
The recommended way of accessing your Key Vault store is via a certificate. The certificate is the one we generated in the previous blog post, but setting it up for usage in an Azure Web App requires a two things.
1. Add the certificate to the Web App.
First, we need to add the certificate to the Web App - The trick here is that in order to add certificates to an Azure Web App, you need to be on a paid plan, the free tier won't allow certificate uploads.

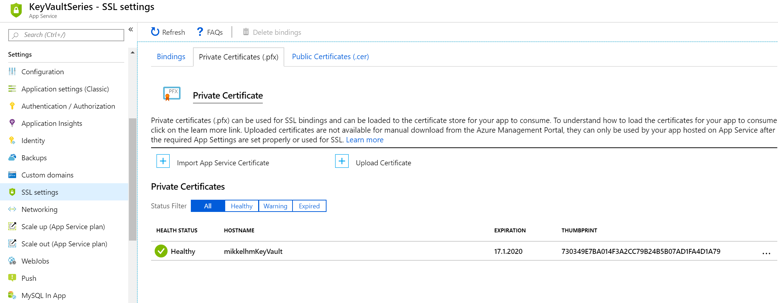
This is done via the SSL Settings menu, here you need to go to "Private certificate", and then add the certificate. You need the .pfx and the password here. Once done, the certificate is ready to be added to the site, but we still need one last thing.
2. App setting to load the certificate.
This seems to be kind of a magic setting, but for your Web App to load the certificiate when it starts, you need to add an appSetting called WEBSITE_LOAD_CERTIFICATES. The setting needs a value of * or the thumbprint of the certificate. If you specify * it will load all certificates from your SSL settings, so it is recommended to just specify the thumbprint of the certificate we know we need.
With the two settings in place, we can deploy our application, and it will be allowed to load the certificate, and utilize Key Vault from it.
One of the sweet things about using an Azure WebApp, is that we can exclude the settings, like the certificate value and the application id from the web.config, but rather just set them via the Web App, as App settings. This allows us to have a Web.config, local that looks like this:
    <!-- Keys for secrets to fetch from the KeyVault -->
    <add key="KeyVaultSecretKey" value="SecretToken" />
    <!-- Fill in with keyvault settings -->
    <add key="KeyVaultThumbprint" value="" />
    <add key="KeyVaultApplicationId" value="" />
    <add key="KeyVaultBaseUrl" value="" />
We can now commit the web.config file, without worrying that someone will be able to get those secrets and misuse them elsewhere. I would even be able to have it pushed to a public repository on GitHub. the only place where the secrets are present is in the appSettings for the Azure Web App.

Check the entire example on GitHub - the example in the code is just an empty ASP.NET Web App, with the Key Vault nuget package added. The changes are done in the Controllers/HomeController.cs file.
